가시다님의 Kubernetes Advanced Networking Study에 참여하게 되어, 스터디 때 다룬 주제를 정리하려고 합니다.
7주차는 Istio를 주제로 진행되었습니다.
이번 글에서는 Istio의 Data Plane인 proxy에 대해 다루고 있습니다.
istio 아키텍처

proxy : data plane, Envoy proxy 기반으로 구성(L4/7 proxy) 되며, 마이크로서비스 간의 모든 네트워크 통신을 라우팅하고 제어함
istiod : control plane
• Pilot - data plane과 통신하며 라우팅 규칙 동기화, 서비스 디스커버리와 로드 밸런싱 설정을 제공
• Citadel - 인증서 관리, mTLS 통신 담당
• Galley - Service의 endpoint 정보 업데이트
Envoy 설치 및 실습
실습 전 Envoy의 주요 용어를 알아보겠습니다.
참고) https://www.envoyproxy.io/docs/envoy/latest/intro/life_of_a_request#terminology

• Cluster: Envoy가 요청을 전달하는 여러 엔드포인트(IP)로 구성된 논리적 서비스
• Endpoint: 실제 접근이 가능한 IP 주소, 네트워크 노드이며, 엔드포인트들은 클러스터로 그룹화됨
• Listener: 특정 IP/포트에 바인딩하여 새로운 TCP 연결(또는 UDP)을 받아들이고, 요청 처리를 위한 다운스트림 관련 작업을 조정하는 Envoy 모듈
• Downstream: Envoy에 연결 요청을 전송. 사이드카 모델에서는 로컬 애플리케이션이 될 수 있으며, 비(非) 사이드카 모델에서는 네트워크 노드나 원격 클라이언트가 될 수 있음
• Upstream: Envoy로부터 서비스 요청을 수신. 사이드카 모델에서는 로컬 애플리케이션이 될 수 있으며, 비(非) 사이드카 모델에서는 원격 백엔드를 의미합니다.
• Filter: Listener 로부터 서비스에 트래픽을 전달하기까지의 요청 처리 파이프라인
• Filter chain: 여러 필터들의 연속적인 집합을 의미
이제 Envoy에 조금 더 친숙해지기 위해 EC2에 Envoy 설치 후 여러 실습을 해보겠습니다.
해당 실습은 아래 페이지를 기반으로 진행됩니다.
참고) https://www.envoyproxy.io/docs/envoy/latest/start/quick-start/
Envoy 설치
wget -O- https://apt.envoyproxy.io/signing.key | sudo gpg --dearmor -o /etc/apt/keyrings/envoy-keyring.gpg
echo "deb [signed-by=/etc/apt/keyrings/envoy-keyring.gpg] https://apt.envoyproxy.io jammy main" | sudo tee /etc/apt/sources.list.d/envoy.list
sudo apt-get update && sudo apt-get install envoy -y

root@testpc:~# envoy --version

envoy  version: e3b4a6e9570da15ac1caffdded17a8bebdc7dfc9/1.32.0/Clean/RELEASE/BoringSSL
[실습 1]
데모 config에는 10000 포트에서 HTTP 요청을 수신하고, www.envoyproxy.io로 proxy하는 설정이 포함되어 있습니다.
또한, Envoy는 기본적으로 IPv4, IPv6를 모두 사용하기 때문에, IPv6를 지원하지 않는 환경이라면 설정을 disable 해야 합니다.
아래 설정에 IPv4만 사용하도록 설정되어 있습니다.
  clusters:
  - name: service_envoyproxy_io
    type: LOGICAL_DNS
    # Comment out the following line to test on v6 networks
    dns_lookup_family: V4_ONLY
이를 배포하고 정상 동작하는지 확인해보겠습니다.
curl -O https://www.envoyproxy.io/docs/envoy/latest/_downloads/92dcb9714fb6bc288d042029b34c0de4/envoy-demo.yaml
envoy -c envoy-demo.yaml
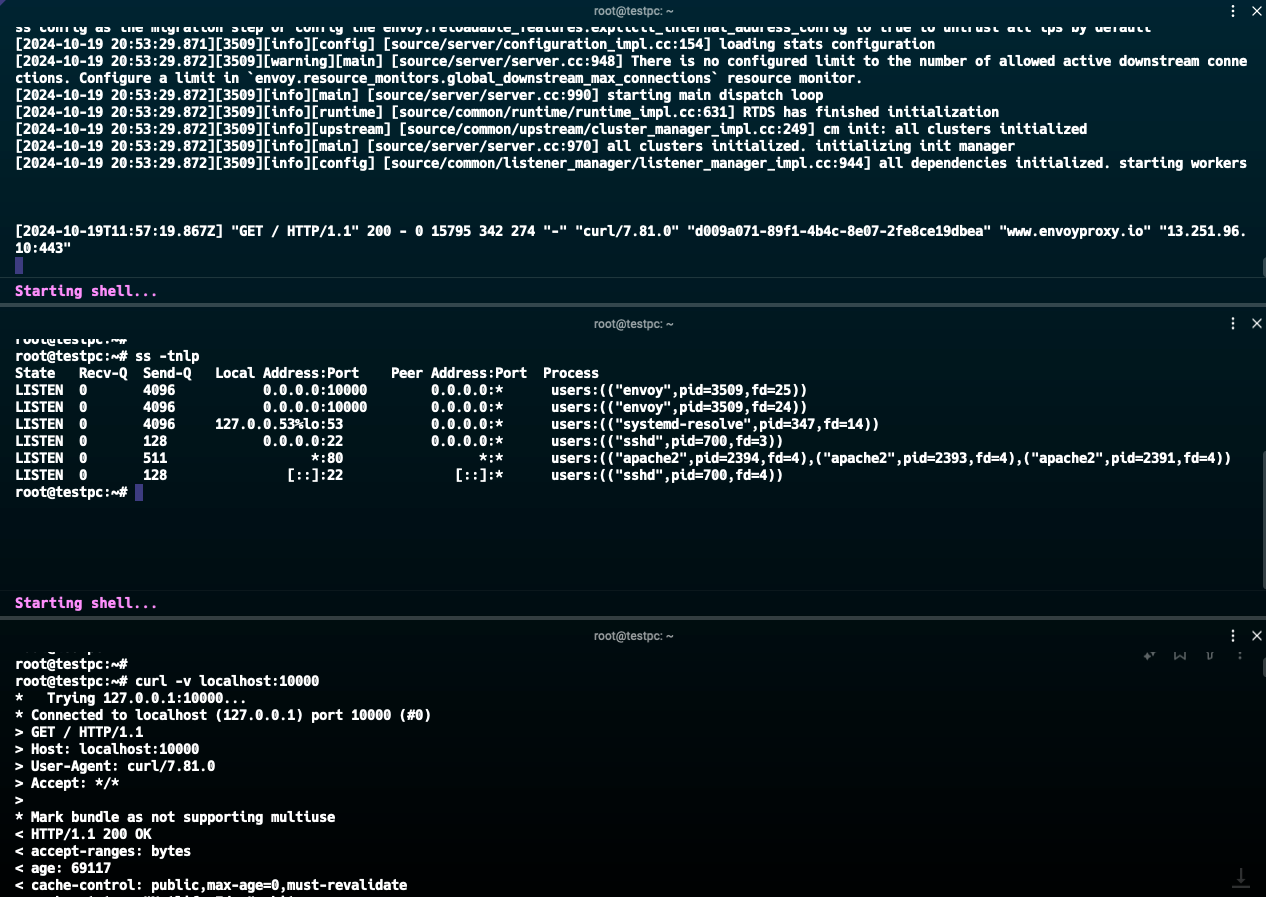
적용 후에 아래와 같이 10000번 포트에 대해 리슨하고 있는 것을 볼 수 있습니다.
root@testpc:~# ss -tnlp
State   Recv-Q  Send-Q   Local Address:Port    Peer Address:Port  Process
LISTEN  0       4096           0.0.0.0:10000        0.0.0.0:*      users:(("envoy",pid=3509,fd=25))
LISTEN  0       4096           0.0.0.0:10000        0.0.0.0:*      users:(("envoy",pid=3509,fd=24))
LISTEN  0       4096     127.0.0.53%lo:53           0.0.0.0:*      users:(("systemd-resolve",pid=347,fd=14))
LISTEN  0       128            0.0.0.0:22           0.0.0.0:*      users:(("sshd",pid=700,fd=3))
LISTEN  0       511                  *:80                 *:*      users:(("apache2",pid=2394,fd=4),("apache2",pid=2393,fd=4),("apache2",pid=2391,fd=4))
LISTEN  0       128               [::]:22              [::]:*      users:(("sshd",pid=700,fd=4))
curl -v localhost:10000 실행 시 www.envoyproxy.io 로 요청이 전달됩니다.

또한, EC2의 ip:10000로 접속해도 www.envoyproxy.io 페이지로 접근하는 것을 볼 수 있습니다.

[실습 2]
이제 아래의 envoy 설정을 override 해보겠습니다.
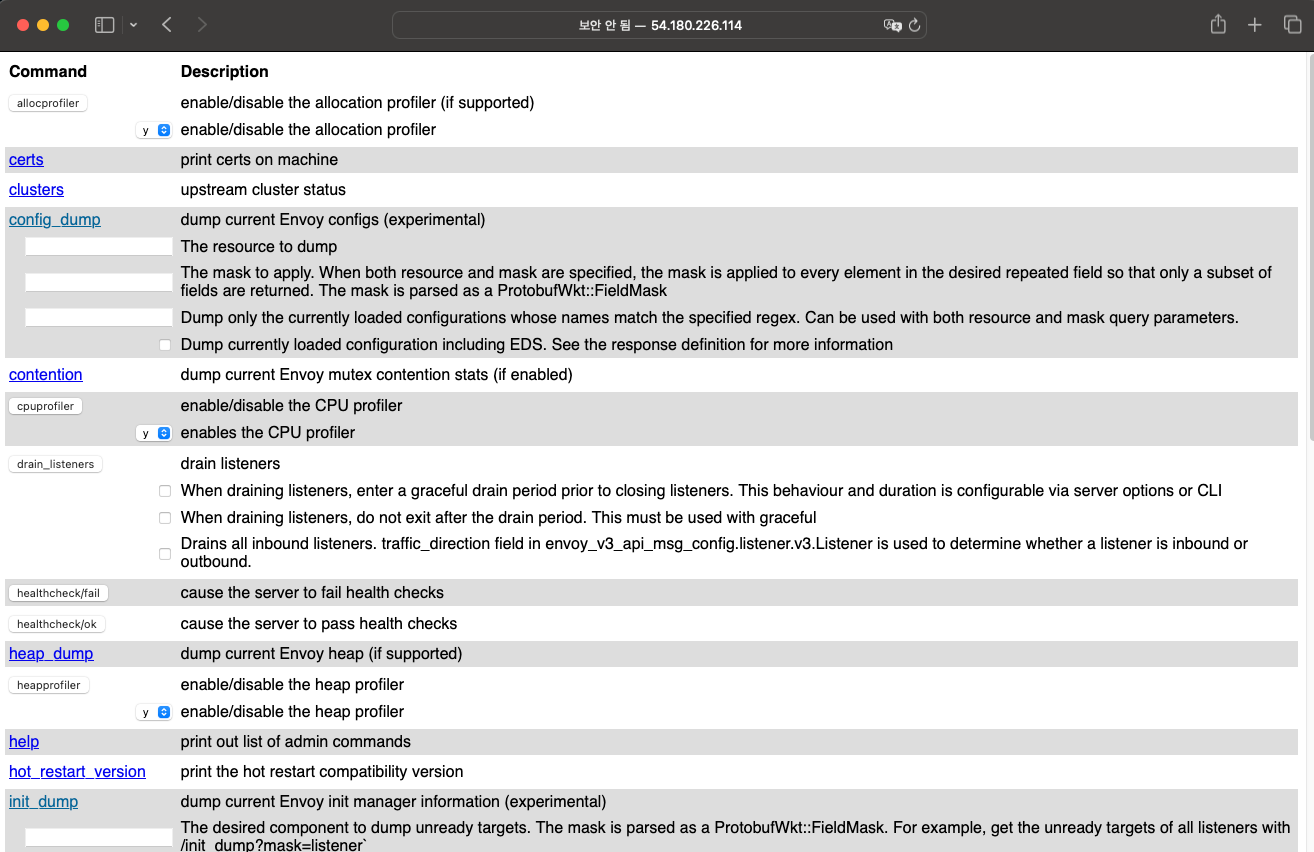
해당 설정은 Envoy의 관리 페이지를 9902 포트로 접근할 수 있게 설정합니다.
cat <<EOT > envoy-override.yaml
admin:
  address:
    socket_address:
      address: 0.0.0.0
      port_value: 9902
EOT

envoy -c envoy-demo.yaml --config-yaml "$(cat envoy-override.yaml)"
설정 후 EC2의 ip:9902로 접속하면 아래와 같은 페이지를 볼 수 있습니다.

[실습 3]
이번에는 Envoy를 validate 모드로 실행해 보겠습니다.
이는 실제 서비스를 시작/재시작하지 않고 Envoy 설정 파일에 대해 검증하는 모드입니다.
설정 파일이 유효한지 확인할 수 있습니다.
root@testpc:~# envoy --mode validate -c envoy-demo.yaml
[2024-10-19 21:12:21.110][3701][info][main] [source/server/server.cc:879] runtime: {}
[2024-10-19 21:12:21.110][3701][info][config] [source/server/configuration_impl.cc:168] loading tracing configuration
[2024-10-19 21:12:21.110][3701][info][config] [source/server/configuration_impl.cc:124] loading 0 static secret(s)
[2024-10-19 21:12:21.110][3701][info][config] [source/server/configuration_impl.cc:130] loading 1 cluster(s)
[2024-10-19 21:12:21.113][3701][info][config] [source/server/configuration_impl.cc:138] loading 1 listener(s)
[2024-10-19 21:12:21.115][3701][warning][misc] [source/extensions/filters/network/http_connection_manager/config.cc:88] internal_address_config is not configured. The existing default behaviour will trust RFC1918 IP addresses, but this will be changed in next release. Please explictily config internal address config as the migration step or config the envoy.reloadable_features.explicit_internal_address_config to true to untrust all ips by default
[2024-10-19 21:12:21.123][3701][info][config] [source/server/configuration_impl.cc:154] loading stats configuration
configuration 'envoy-demo.yaml' OK
기존 envoy-demo.yaml 파일을 복사한 후에 syntax 오류를 인위적으로 넣고 실행하면 아래와 같은 error 메세지를 볼 수 있습니다.
root@testpc:~# envoy --mode validate -c envoy-demo-error.yaml
[2024-10-19 21:13:09.493][3742][critical][main] [source/server/config_validation/server.cc:71] error initializing configuration 'envoy-demo-error.yaml': Protobuf message (type envoy.config.bootstrap.v3.Bootstrap reason INVALID_ARGUMENT: invalid JSON  in envoy.config.bootstrap.v3.Bootstrap, near 1:20 (offset 19): no such field: 'tatic_resources') has unknown fields
[실습 4]
Envoy system log는 기본적으로 /dev/stderr에 보내지는데, 로그 path를 변경해 보겠습니다.
mkdir logs
envoy -c envoy-demo.yaml --log-path logs/custom.log
envoy를 실행하면 logs/custom.log에 로그가 발생하는 것을 볼 수 있습니다.
root@testpc:~/logs# ls
custom.log
root@testpc:~/logs# tail -f custom.log
[2024-10-19 21:17:26.420][3754][info][config] [source/server/configuration_impl.cc:130] loading 1 cluster(s)
[2024-10-19 21:17:26.422][3754][info][config] [source/server/configuration_impl.cc:138] loading 1 listener(s)
[2024-10-19 21:17:26.425][3754][warning][misc] [source/extensions/filters/network/http_connection_manager/config.cc:88] internal_address_config is not configured. The existing default behaviour will trust RFC1918 IP addresses, but this will be changed in next release. Please explictily config internal address config as the migration step or config the envoy.reloadable_features.explicit_internal_address_config to true to untrust all ips by default
[2024-10-19 21:17:26.426][3754][info][config] [source/server/configuration_impl.cc:154] loading stats configuration
또한, access log는 /dev/stdout으로 전송하여, 로그를 분리하는 것도 가능합니다.
[실습 5]
Envoy에 대한 로그 레벨은 기본적으로 info이며, 개별적으로 레벨 변경이 가능합니다. (참고)
envoy -c envoy-demo.yaml -l off --component-log-level upstream:debug,connection:trace
Envoy 설정 파일 이해하기
이제 Envoy 설정 파일을 조금 더 자세히 살펴보겠습니다.
참고) https://www.envoyproxy.io/docs/envoy/latest/start/quick-start/configuration-static
static_resources:  ## Envoy가 시작될 때 정적으로 설정되는 것

  listeners:
  - name: listener_0
    address:
      socket_address:
        address: 0.0.0.0
        port_value: 10000
    filter_chains:
    - filters:
      - name: envoy.filters.network.http_connection_manager
        typed_config:
          "@type": type.googleapis.com/envoy.extensions.filters.network.http_connection_manager.v3.HttpConnectionManager
          stat_prefix: ingress_http
          access_log:
          - name: envoy.access_loggers.stdout
            typed_config:
              "@type": type.googleapis.com/envoy.extensions.access_loggers.stream.v3.StdoutAccessLog
          http_filters:
          - name: envoy.filters.http.router
            typed_config:
              "@type": type.googleapis.com/envoy.extensions.filters.http.router.v3.Router
          route_config:     ## path가 일치하는 경우 service_envoyproxy_io로 라우트
            name: local_route
            virtual_hosts:
            - name: local_service
              domains: ["*"]
              routes:
              - match:
                  prefix: "/"
                route:
                  host_rewrite_literal: www.envoyproxy.io
                  cluster: service_envoyproxy_io

  clusters:
  - name: service_envoyproxy_io
    type: LOGICAL_DNS
    # Comment out the following line to test on v6 networks
    dns_lookup_family: V4_ONLY
    load_assignment:
      cluster_name: service_envoyproxy_io
      endpoints:
      - lb_endpoints: ## 실제 연결할 대상 정의
        - endpoint:
            address:
              socket_address:
                address: www.envoyproxy.io
                port_value: 443
    transport_socket:
      name: envoy.transport_sockets.tls
      typed_config:
        "@type": type.googleapis.com/envoy.extensions.transport_sockets.tls.v3.UpstreamTlsContext
        sni: www.envoyproxy.io
위 demo 파일은 static 설정이며, istio를 사용하는 경우에는 control plane을 통해 Envoy proxy 설정 변경이 필요하므로, 아래와 같은 설정이 포함되어야 합니다.
node:
  cluster: test-cluster
  id: test-id

dynamic_resources: ## 동적으로 로드할 설정을 지정하며, 연결할 클러스터를 명시
  ads_config:
    api_type: GRPC
    grpc_services:
    - envoy_grpc:
        cluster_name: xds_cluster
  cds_config:
    ads: {}
  lds_config:
    ads: {}

static_resources:
  clusters:
  - type: STRICT_DNS
    typed_extension_protocol_options:
      envoy.extensions.upstreams.http.v3.HttpProtocolOptions:
        "@type": type.googleapis.com/envoy.extensions.upstreams.http.v3.HttpProtocolOptions
        explicit_http_config:
          http2_protocol_options: {}
    name: xds_cluster
    load_assignment:
      cluster_name: xds_cluster
      endpoints:
      - lb_endpoints: ## control plane에 질의할 수 있도록 구성
        - endpoint:
            address:
              socket_address:
                address: my-control-plane
                port_value: 18000

admin:
  address:
    socket_address:
      address: 0.0.0.0
      port_value: 19000
이제 istio 설치 후에 해당 파일 설정을 확인해보겠습니다.
istio 설치
# istioctl 설치
export ISTIOV=1.23.2
echo "export ISTIOV=1.23.2" >> /etc/profile
curl -s -L https://istio.io/downloadIstio | ISTIO_VERSION=$ISTIOV TARGET_ARCH=x86_64 sh -
tree istio-$ISTIOV -L 2 # sample yaml 포함
cp istio-$ISTIOV/bin/istioctl /usr/local/bin/istioctl
istioctl version --remote=false

istioctl profile dump demo > demo-profile.yaml
istioctl install -f demo-profile.yaml -y
참고로 아래와 같은 설정으로 설치합니다.
apiVersion: install.istio.io/v1alpha1
kind: IstioOperator
spec:
  components:
    base:
      enabled: true
    egressGateways:
    - enabled: true
      name: istio-egressgateway
    ingressGateways:
    - enabled: true
      name: istio-ingressgateway
    pilot:
      enabled: true
  hub: docker.io/istio
  profile: demo
  tag: 1.23.2
  values:
    defaultRevision: ""
    gateways:
      istio-egressgateway: {}
      istio-ingressgateway: {}
    global:
      configValidation: true
      istioNamespace: istio-system
    profile: demo
설치 완료 후 istio-system 네임스페이스에 여러 오브젝트가 생성된 것을 확인할 수 있습니다.
(⎈|default:N/A) root@k3s-s:~# istioctl install -f demo-profile.yaml -y
        |\
        | \
        |  \
        |   \
      /||    \
     / ||     \
    /  ||      \
   /   ||       \
  /    ||        \
 /     ||         \
/______||__________\
____________________
  \__       _____/
     \_____/

✔ Istio core installed ⛵️
✔ Istiod installed 🧠
✔ Ingress gateways installed 🛬
✔ Egress gateways installed 🛫
✔ Installation complete
Made this installation the default for cluster-wide operations.

kubectl get all,svc,ep,sa,cm,secret,pdb -n istio-system
kubectl get crd | grep istio.io | sort
default 네임스페이스에 side car injection을 활성화하고 파드를 생성해보겠습니다.
kubectl label namespace default istio-injection=enabled
kubectl run nginx --image=nginx
(⎈|default:N/A) root@k3s-s:~# k get po
NAME    READY   STATUS    RESTARTS   AGE
nginx   2/2     Running   0          6s
nginx 파드에 컨테이너가 2개가 있는 것을 볼 수 있습니다.
이제 istio-proxy 컨테이너로 접속해보겠습니다.
kubectl debug -it nginx -n default --image nicolaka/netshoot --target=istio-proxy15000번대 포트를 다수 리슨하고 있고, etc/istio/proxy/envoy-rev.json 파일에서 설정을 읽어가는 것을 볼 수 있습니다.
참고로, nginx 파드의 sidecar 컨테이너 설정을 확인하면, emptyDir을 사용하는 것을 확인할 수 있습니다.
nginx ~ ss -tnlp
State Recv-Q Send-Q Local Address:Port Peer Address:Port Process
LISTEN 0 511 0.0.0.0:80 0.0.0.0:*
LISTEN 0 4096 127.0.0.1:15000 0.0.0.0:*
LISTEN 0 4096 127.0.0.1:15004 0.0.0.0:*
LISTEN 0 4096 0.0.0.0:15021 0.0.0.0:*
LISTEN 0 4096 0.0.0.0:15021 0.0.0.0:*
LISTEN 0 4096 0.0.0.0:15006 0.0.0.0:*
LISTEN 0 4096 0.0.0.0:15006 0.0.0.0:*
LISTEN 0 4096 0.0.0.0:15001 0.0.0.0:*
LISTEN 0 4096 0.0.0.0:15001 0.0.0.0:*
LISTEN 0 4096 0.0.0.0:15090 0.0.0.0:*
LISTEN 0 4096 0.0.0.0:15090 0.0.0.0:*
LISTEN 0 511 [::]:80 [::]:*
LISTEN 0 4096 *:15020 *:*
nginx ~ ps -ef
PID USER TIME COMMAND
1 1337 0:00 /usr/local/bin/pilot-agent proxy sidecar --domain default.svc.cluster.local --proxyLogLevel=warning --proxyComponentLogLevel=misc:er
14 1337 0:00 /usr/local/bin/envoy -c etc/istio/proxy/envoy-rev.json --drain-time-s 45 --drain-strategy immediate --local-address-ip-version v4 --
28 root 0:01 zsh
117 root 0:00 ps -ef해당 파일을 살펴보면, 기존 Envoy 설정에 비해 조금 복잡하지만, 유사한 내용이 json 형태로 작성된 것을 확인할 수 있습니다.
root@k3s-w2:/var/lib/kubelet/pods/7ad60e5d-57fd-45a3-a2f6-36fae75a20f3/volumes/kubernetes.io~empty-dir/istio-envoy# cat envoy-rev.json
{
  "application_log_config": {
    "log_format": {
        "text_format": "%Y-%m-%dT%T.%fZ\t%l\tenvoy %n %g:%#\t%v\tthread=%t"
    }
  },
  "node": {
    "id": "sidecar~172.16.2.7~nginx.default~default.svc.cluster.local",
    "cluster": "nginx.default",
    "locality": {
    },
    "metadata": {"ANNOTATIONS":{"istio.io/rev":"default","kubectl.kubernetes.io/default-container":"nginx","kubectl.kubernetes.io/default-logs-container":"nginx","kubernetes.io/config.seen":"2024-10-19T21:58:33.783537862+09:00","kubernetes.io/config.source":"api","prometheus.io/path":"/stats/prometheus","prometheus.io/port":"15020","prometheus.io/scrape":"true","sidecar.istio.io/status":"{\"initContainers\":[\"istio-init\"],\"containers\":[\"istio-proxy\"],\"volumes\":[\"workload-socket\",\"credential-socket\",\"workload-certs\",\"istio-envoy\",\"istio-data\",\"istio-podinfo\",\"istio-token\",\"istiod-ca-cert\"],\"imagePullSecrets\":null,\"revision\":\"default\"}"},"APP_CONTAINERS":"nginx","CLUSTER_ID":"Kubernetes","ENVOY_PROMETHEUS_PORT":15090,"ENVOY_STATUS_PORT":15021,"INSTANCE_IPS":"172.16.2.7","INTERCEPTION_MODE":"REDIRECT","ISTIO_PROXY_SHA":"6c72b2179f5a58988b920a55b0be8346de3f7b35","ISTIO_VERSION":"1.23.2","LABELS":{"run":"nginx","security.istio.io/tlsMode":"istio","service.istio.io/canonical-name":"nginx","service.istio.io/canonical-revision":"latest"},"MESH_ID":"cluster.local","NAME":"nginx","NAMESPACE":"default","NODE_NAME":"k3s-w2","OWNER":"kubernetes://apis/v1/namespaces/default/pods/nginx","PILOT_SAN":["istiod.istio-system.svc"],"POD_PORTS":"[\n]","PROXY_CONFIG":{"binaryPath":"/usr/local/bin/envoy","concurrency":2,"configPath":"./etc/istio/proxy","controlPlaneAuthPolicy":"MUTUAL_TLS","discoveryAddress":"istiod.istio-system.svc:15012","drainDuration":"45s","proxyAdminPort":15000,"serviceCluster":"istio-proxy","statNameLength":189,"statusPort":15020,"terminationDrainDuration":"5s"},"SERVICE_ACCOUNT":"default","WORKLOAD_NAME":"nginx"}
  },
... 중략 ...
  "admin": {
    "access_log": [
      {
        "name": "envoy.access_loggers.file",
        "typed_config": {
          "@type": "type.googleapis.com/envoy.extensions.access_loggers.file.v3.FileAccessLog",
          "path": "/dev/null"
        }
      }
    ],
    "profile_path": "/var/lib/istio/data/envoy.prof",
    "address": {
      "socket_address": {
        "address": "127.0.0.1",
        "port_value": 15000
      }
    }
  },
  "dynamic_resources": {
    "lds_config": {
      "ads": {},
      "initial_fetch_timeout": "0s",
      "resource_api_version": "V3"
    },
    "cds_config": {
      "ads": {},
      "initial_fetch_timeout": "0s",
      "resource_api_version": "V3"
    },
    "ads_config": {
      "api_type": "DELTA_GRPC", ## 변경된 내용만 업데이트하도록 설정
      "set_node_on_first_message_only": true,
      "transport_api_version": "V3",
      "grpc_services": [
        {
          "envoy_grpc": {
            "cluster_name": "xds-grpc"
          }
        }
      ]
    }
  },
  "static_resources": {
    "clusters": [
      {
        "name": "prometheus_stats",
        "alt_stat_name": "prometheus_stats;",
        "type": "STATIC",
        "connect_timeout": "0.250s",
        "lb_policy": "ROUND_ROBIN",
        "load_assignment": {
          "cluster_name": "prometheus_stats",
          "endpoints": [{
            "lb_endpoints": [{
              "endpoint": {
                "address":{
                  "socket_address": {
                    "protocol": "TCP",
                    "address": "127.0.0.1",
                    "port_value": 15000
                  }
                }
              }
            }]
          }]
        }
      },
      {
        "name": "agent",
        "alt_stat_name": "agent;",
        "type": "STATIC",
        "connect_timeout": "0.250s",
        "lb_policy": "ROUND_ROBIN",
        "load_assignment": {
          "cluster_name": "agent",
          "endpoints": [{
            "lb_endpoints": [{
              "endpoint": {
                "address":{
                  "socket_address": {
                    "protocol": "TCP",
                    "address": "127.0.0.1",
                    "port_value": 15020
                  }
                }
              }
            }]
          }]
        }
      },
      {
        "name": "sds-grpc",
        "alt_stat_name": "sds-grpc;",
        "type": "STATIC",
        "typed_extension_protocol_options": {
          "envoy.extensions.upstreams.http.v3.HttpProtocolOptions": {
           "@type": "type.googleapis.com/envoy.extensions.upstreams.http.v3.HttpProtocolOptions",
           "explicit_http_config": {
            "http2_protocol_options": {}
           }
          }
        },
        "connect_timeout": "1s",
        "lb_policy": "ROUND_ROBIN",
        "load_assignment": {
          "cluster_name": "sds-grpc",
          "endpoints": [{
            "lb_endpoints": [{
              "endpoint": {
                "address":{
                  "pipe": {
                    "path": "./var/run/secrets/workload-spiffe-uds/socket"
                  }
                }
              }
            }]
          }]
        }
      },
      {
        "name": "xds-grpc", ## Envoy 동적 구성을 관리하는데 사용
        "alt_stat_name": "xds-grpc;",
        "type" : "STATIC",
        "connect_timeout": "1s",
        "lb_policy": "ROUND_ROBIN",
        "load_assignment": {
          "cluster_name": "xds-grpc",
          "endpoints": [{
            "lb_endpoints": [{
              "endpoint": {
                "address":{
                  "pipe": {
                    "path": "./etc/istio/proxy/XDS"
                  }
                }
              }
            }]
          }]
        },
        "circuit_breakers": {
          "thresholds": [
            {
              "priority": "DEFAULT",
              "max_connections": 100000,
              "max_pending_requests": 100000,
              "max_requests": 100000
            },
            {
              "priority": "HIGH",
              "max_connections": 100000,
              "max_pending_requests": 100000,
              "max_requests": 100000
            }
          ]
        },
        "upstream_connection_options": {
          "tcp_keepalive": {
            "keepalive_time": 300
          }
        },
        "max_requests_per_connection": 1,
        "typed_extension_protocol_options": {
          "envoy.extensions.upstreams.http.v3.HttpProtocolOptions": {
           "@type": "type.googleapis.com/envoy.extensions.upstreams.http.v3.HttpProtocolOptions",
           "explicit_http_config": {
            "http2_protocol_options": {}
           }
          }
        }
      }


    ],
    "listeners":[
      {
        "address": {
          "socket_address": {
            "protocol": "TCP",
            "address": "0.0.0.0",

            "port_value": 15090
          }
        },
        "filter_chains": [
          {
            "filters": [
              {
                "name": "envoy.filters.network.http_connection_manager",
                "typed_config": {
                  "@type": "type.googleapis.com/envoy.extensions.filters.network.http_connection_manager.v3.HttpConnectionManager",
                  "codec_type": "AUTO",
                  "stat_prefix": "stats",
                  "route_config": {
                    "virtual_hosts": [
                      {
                        "name": "backend",
                        "domains": [
                          "*"
                        ],
                        "routes": [
                          {
                            "match": {
                              "prefix": "/stats/prometheus"
                            },
                            "route": {
                              "cluster": "prometheus_stats"
                            }
                          }
                        ]
                      }
                    ]
                  },
                  "http_filters": [
                  {
                    "name": "envoy.filters.http.router",
                    "typed_config": {
                      "@type": "type.googleapis.com/envoy.extensions.filters.http.router.v3.Router"
                    }
                  }]
                }
              }
            ]
          }
        ]
      },
      {
        "address": {
           "socket_address": {
             "protocol": "TCP",
             "address": "0.0.0.0",
             "port_value": 15021
           }
        },
        "filter_chains": [
          {
            "filters": [
              {
                "name": "envoy.filters.network.http_connection_manager",
                "typed_config": {
                  "@type": "type.googleapis.com/envoy.extensions.filters.network.http_connection_manager.v3.HttpConnectionManager",
                  "codec_type": "AUTO",
                  "stat_prefix": "agent",
                  "route_config": {
                    "virtual_hosts": [
                      {
                        "name": "backend",
                        "domains": [
                          "*"
                        ],
                        "routes": [
                          {
                            "match": {
                              "prefix": "/healthz/ready"
                            },
                            "route": {
                              "cluster": "agent"
                            }
                          }
                        ]
                      }
                    ]
                  },
                  "http_filters": [{
                    "name": "envoy.filters.http.router",
                    "typed_config": {
                      "@type": "type.googleapis.com/envoy.extensions.filters.http.router.v3.Router"
                    }
                  }]
                }
              }
            ]
          }
        ]
      }
    ]
  }


  ,
  "cluster_manager": {
    "enable_deferred_cluster_creation": true,
  }

}
지금까지 Envoy에 관한 간단한 실습과 istio 설치 후 설정된 Envoy 설정 파일을 확인해 봤습니다.
'Kubernetes > Network Study' 카테고리의 다른 글
| Amazon EKS VPC CNI + AWS LB Controller 사용 시 설정 별 통신 흐름 (0) | 2024.11.02 |
|---|---|
| Cilium CNI와 eBPF (4) | 2024.10.26 |
| CoreDNS와 NodeLocal DNS 이해하기 (0) | 2024.10.19 |
| kube-proxy IPVS 모드 (2) | 2024.10.18 |
| kube-proxy 모니터링 환경 구성 실습(serviceMonitor, podMonitor) (3) | 2024.10.16 |